Dearest Sylwi
This week, I began with one idea and ended up with a completely different version of it!
For a while now, I've been fascinated by Fair Isle knitting patterns. I wanted to paint my snowflake the other week with this pattern. In fact, I wanted to paint several snowflakes with different patterns and hang them in a garland, but papier-mâché didn't turn out to be my strongest skill (ha!) and time ran out!
So, this week, I thought I'd do a simple origami Christmas tree, but use paper that I'd painted with various Fair Isle patterns to fold the tree with. Again, time ran out! Grrr! So, with no time to paint, instead, I decided to keep it simple and just make a quick origami card.
First, I folded the tree, following this origami Christmas tree tutorial that I found on "Ish" blog. It's a wonder that I got around to anything else today, once I started scrolling through Carole's beautiful blog. It's fairly addictive, browsing through all of her inspiration and ideas!
For the tree topper, I then followed this great star tutorial on the 'Extreme Cards and Papercrafting' website (where I got very distracted by a whole host of other brilliant tutorials that I'd also like to try!)
As the pentagon for the star needs to be cut out perfectly, in order to not mess up the paper folding later, I found one on Google here and traced it, just to be certain that my edges were all straight.
A bit of glue and some sparkly hearts later and ta-dahhh!
Nothing like the pretty picture I had in my head when I began, but at least I created something. And I'm FINALLY back up to date with my posts. Yahoo! :-)
I know you're busy this week, but hope you're still managing to have some fun in the run up to Christmas.
Lots and lots and lots of love to you.
Fi
xx
Showing posts with label Paper. Show all posts
Wednesday, December 15, 2010
Tuesday, December 14, 2010
Step Forty Six: Some good news! :-)
Dearest Sylwi
I'm not only behind with my Steps, but also with this 'congratulations!' card that I should have sent off a few weeks ago!
A very special friend of mine announced that he and his wife are expecting a baby next year! Awww! So, here's the card I made for them this afternoon out of brown paper, red embroidery thread, white paint and a pencil!
The Mum-To-Be is Polish, so I was wondering if you could give me some help writing it?! Or, at least, what is the word for "congratulations!" in Polish? :-)
{ Almost caught up with my Steps. One more to do this week. I won't be posting it today though. I haven't even decided what I'm doing for it yet! ha ha! But I will post it sooooooooooon! ;-) }
Lots and lots of love
Fi
xx
I'm not only behind with my Steps, but also with this 'congratulations!' card that I should have sent off a few weeks ago!
A very special friend of mine announced that he and his wife are expecting a baby next year! Awww! So, here's the card I made for them this afternoon out of brown paper, red embroidery thread, white paint and a pencil!
The Mum-To-Be is Polish, so I was wondering if you could give me some help writing it?! Or, at least, what is the word for "congratulations!" in Polish? :-)
{ Almost caught up with my Steps. One more to do this week. I won't be posting it today though. I haven't even decided what I'm doing for it yet! ha ha! But I will post it sooooooooooon! ;-) }
Lots and lots of love
Fi
xx
Tuesday, November 16, 2010
Step Forty Three: Layering Paper
Dearest Sylwi
There's so much I want to write for this post, but my eyes are so tired, I'm going to take it easy and make a list instead!
I found out this week that the reason I've been getting so many headaches and sore eyes is that I have a little inflammation in both eyes, but also, that I'm becoming long-sighted! After 38 years of perfect vision, my eyes are beginning to fail me! So, I'm going to have to get reading glasses. Till then (and till the inflammation clears up), I'm trying to spend as much time offline as I can. I debated not posting today, but habit kicked in and I thought I'd do a quick upload. It's all a bit scrappy, quite frankly, but never mind! hee! ;-)
Anyway, here's the list...
The pros:
- this is something I've wanted to try with paper for a while
- I found this beautiful vintage flower pattern in a great free source of embroidery patterns online, so I could get on with cutting, rather than trying to design my own flowers first
- I really enjoyed embossing the paper and layering it
- using tiny little adhesive foam pads to build up the layers of paper worked really well
- I'd like to continue exploring other ideas with this technique. Not sure what exactly!
- I really enjoy working with brown parcel paper.
... but...
The cons:
- I'm not sure I like the contrast of white paper against the brown (although, I've discovered that I love white paint on brown paper!)
- I loved the first flower in the centre, but as I kept adding to it, I started to dislike it! It started out much better than it finished! ha ha!
- it doesn't look that great from the side, as you can see the foam stickers behind the flowers
- I'm too tired to play around with lighting to take a photo of it tonight. I hope you can kind of work out what I was trying to do
- I had intended to do the black bits with thread, but had no time, so just inked them! (cheat! ha!)
There's so much I want to write for this post, but my eyes are so tired, I'm going to take it easy and make a list instead!
I found out this week that the reason I've been getting so many headaches and sore eyes is that I have a little inflammation in both eyes, but also, that I'm becoming long-sighted! After 38 years of perfect vision, my eyes are beginning to fail me! So, I'm going to have to get reading glasses. Till then (and till the inflammation clears up), I'm trying to spend as much time offline as I can. I debated not posting today, but habit kicked in and I thought I'd do a quick upload. It's all a bit scrappy, quite frankly, but never mind! hee! ;-)
Anyway, here's the list...
The pros:
- this is something I've wanted to try with paper for a while
- I found this beautiful vintage flower pattern in a great free source of embroidery patterns online, so I could get on with cutting, rather than trying to design my own flowers first
- I really enjoyed embossing the paper and layering it
- using tiny little adhesive foam pads to build up the layers of paper worked really well
- I'd like to continue exploring other ideas with this technique. Not sure what exactly!
- I really enjoy working with brown parcel paper.
... but...
The cons:
- I'm not sure I like the contrast of white paper against the brown (although, I've discovered that I love white paint on brown paper!)
- I loved the first flower in the centre, but as I kept adding to it, I started to dislike it! It started out much better than it finished! ha ha!
- it doesn't look that great from the side, as you can see the foam stickers behind the flowers
- I'm too tired to play around with lighting to take a photo of it tonight. I hope you can kind of work out what I was trying to do
- I had intended to do the black bits with thread, but had no time, so just inked them! (cheat! ha!)
Sorry to hear you had such a rough week last week. I'll be back to write much more tomorrow and to comment properly on your post.
Hope you're okay. Lots and lots of love,
Fi
xx
Tuesday, November 2, 2010
Step Forty One: A Spooktacular Pumpkin Garland! ;-)
Dearest Sylwi
This week I decided to do something Halloween themed. I wasn't going to bother, as it's a couple of days late, but today when I sat down to create, I changed my mind.
I sprained my ankle last week, so had a very boring weekend. I spent it propped up on the sofa, with my ankle on ice and I feel as though I completely missed the fun of Halloween. I didn't go out and we weren't visited by any guisers, so it almost feels like it didn't happen! :-(
My initial idea was to create Jack-O'-Lanterns, using old tin cans with holes cut in them and tea lights inside. The idea might work, but it quickly became apparent that it wasn't going to work for me today! I made a big ol' mess of a tin and the edges were extremely jaggy and dangerous, so I decided to try something a little easier! :-)
I know I made paper garlands a few weeks ago, but for some reason, I didn't get them out of my system! :-)
I tried cutting a paper chain of pumpkins, but by the time I had folded the paper, concertina style and attempted to cut through all of the layers, I realised it was too fiddly.
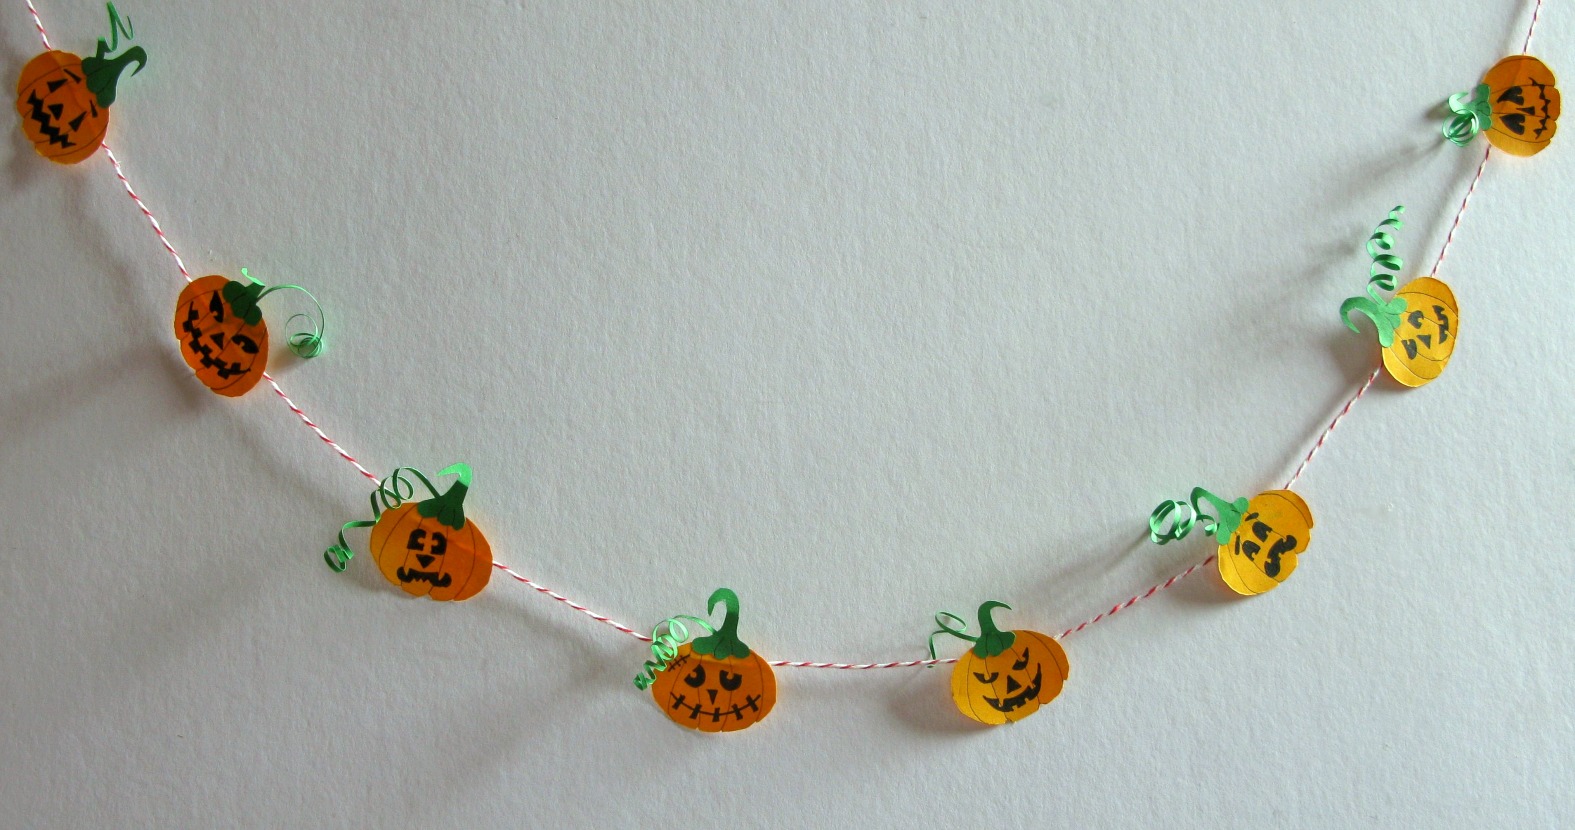
So, I cut a very basic pumpkin shape instead and individually drew on the details and faces. I thought at first it was going to be too much work and very boring indeed, but drawing different faces on each pumpkin turned out to be so much fun. More fun than pumpkin carving (where you only get one shot to carve the face) and nowhere near as messy!
After I had drawn the faces, I cut out some stalks and quilled some thin strips of green to make spindly tendrils...
... and then glued them to my pumpkin heads.
I didn't have time to create a pretty set up over which to hang my pumpkin garland...
I'm so glad I did this today! I now feel like Halloween happened and the Jack-O'-Lanterns and their different faces / personalities made me laugh as I drew them!
Right, I'm off to do some more work on the novel I'm writing! {mwah ha ha ha haaaaa!} Not really. I just like saying that!
Well, maybe sort of.
I AM writing a novel, but not one I ever think will be published. I've signed up for NaNoWriMo (National Novel Writing Month). The goal is to write a novel during the month of November - specifically 1,667 words every day, for 30 days, starting on the 1st of November.
Yesterday, I wrote 1,723 words and the high I experienced on finishing, verged on euphoric! :-) However, this morning, I wondered how I shall even write 100 more words on the same subject, let alone 1,667... for 29 more days! :-) ha!
{hee hee! Now, I know how you feel when you're writing your papers!!} ;-)
Whatever the outcome, it feels like a great way to squish my inner critic and write freely for once. To do, rather than just dream... a bit like this 52 Steps challenge! :-)
How was your Halloween? What did you get up to? Did the kids (and you!) love it?!
Lots of love
Fi
This week I decided to do something Halloween themed. I wasn't going to bother, as it's a couple of days late, but today when I sat down to create, I changed my mind.
I sprained my ankle last week, so had a very boring weekend. I spent it propped up on the sofa, with my ankle on ice and I feel as though I completely missed the fun of Halloween. I didn't go out and we weren't visited by any guisers, so it almost feels like it didn't happen! :-(
My initial idea was to create Jack-O'-Lanterns, using old tin cans with holes cut in them and tea lights inside. The idea might work, but it quickly became apparent that it wasn't going to work for me today! I made a big ol' mess of a tin and the edges were extremely jaggy and dangerous, so I decided to try something a little easier! :-)
I know I made paper garlands a few weeks ago, but for some reason, I didn't get them out of my system! :-)
I tried cutting a paper chain of pumpkins, but by the time I had folded the paper, concertina style and attempted to cut through all of the layers, I realised it was too fiddly.
So, I cut a very basic pumpkin shape instead and individually drew on the details and faces. I thought at first it was going to be too much work and very boring indeed, but drawing different faces on each pumpkin turned out to be so much fun. More fun than pumpkin carving (where you only get one shot to carve the face) and nowhere near as messy!
After I had drawn the faces, I cut out some stalks and quilled some thin strips of green to make spindly tendrils...
... and then glued them to my pumpkin heads.
![]() |
| *Eep!* "Please don't give me a hideous hairstyle like the others..." |
... which unfortunately meant that the above photo looked fairly boring!
I'm determined that just once during these 52 Steps, I'm going to create a properly styled backdrop for one of my photos! :-)
But, not today!! :-))
However, I did put some effort in and tried to jazz up my pumpkins a bit, by using them as a gift wrap tie.
I'm so glad I did this today! I now feel like Halloween happened and the Jack-O'-Lanterns and their different faces / personalities made me laugh as I drew them!
Right, I'm off to do some more work on the novel I'm writing! {mwah ha ha ha haaaaa!} Not really. I just like saying that!
Well, maybe sort of.
I AM writing a novel, but not one I ever think will be published. I've signed up for NaNoWriMo (National Novel Writing Month). The goal is to write a novel during the month of November - specifically 1,667 words every day, for 30 days, starting on the 1st of November.
Yesterday, I wrote 1,723 words and the high I experienced on finishing, verged on euphoric! :-) However, this morning, I wondered how I shall even write 100 more words on the same subject, let alone 1,667... for 29 more days! :-) ha!
{hee hee! Now, I know how you feel when you're writing your papers!!} ;-)
Whatever the outcome, it feels like a great way to squish my inner critic and write freely for once. To do, rather than just dream... a bit like this 52 Steps challenge! :-)
How was your Halloween? What did you get up to? Did the kids (and you!) love it?!
Lots of love
Fi
xx
Tuesday, October 19, 2010
Step Thirty Nine: Celebrating origami with paper fireworks!
Dearest Sylwi
No words this week, just pictures! :-)
I could write an entire post on how tired, empty and 'oversubscribed' to everything I'm feeling at the mo... but I won't! heee! ;-) Instead, here's a pretty, distracting, little origami project for this week's Step.
Inspiration came from this amazing tutorial video from jonakashima on YouTube. Beautifully clear instructions and ...with a little patience, (not my strong point, grrr!) ;-) surprisingly simple to put together!
Origami Firework (by Yami Yamauchi)
Yipee!
Lots of love,
Fi
xx
No words this week, just pictures! :-)
I could write an entire post on how tired, empty and 'oversubscribed' to everything I'm feeling at the mo... but I won't! heee! ;-) Instead, here's a pretty, distracting, little origami project for this week's Step.
Inspiration came from this amazing tutorial video from jonakashima on YouTube. Beautifully clear instructions and ...with a little patience, (not my strong point, grrr!) ;-) surprisingly simple to put together!
Origami Firework (by Yami Yamauchi)
Yipee!
Lots of love,
Fi
xx
Tuesday, February 9, 2010
Step Five: Love Letters
Morning Sweet Sylwi... or should I say, Afternoon?! I'm posting so late, it probably already is afternoon with you!
I've been sort of dreading today because I'm only just getting over being sick, so I was wondering how on earth I would find any inspiration or energy to create anything... apart from maybe a cup of tea! ;-)
So, I decided to keep it simple this week with a super sweet, useful and quick way to fold paper.
I think this style of folding originated back in Victorian times, as a sort of love letter called a 'puzzle purse' (although, I've also come across it called a 'thread container' in Japan) so who knows where it originated! :-)
It was called a puzzle purse because the recipient would have to open the folded paper in a certain order. Written inside all of the folds and on the very inside would be a love letter or poem. Some were also beautifully decorated with drawings. The puzzle was then to close the purse in the correct order.
You can see some photos of beautiful, original examples on Nancy Rosin's Victorian Treasury site. You can also find instructions on how to fold the purses there. Or, there are also some good instructions here.
Rather than write a poem in one (or paint one), I decided to use this method of folding as an envelope for a Valentine's ATC. I chose a piece of gorgeous, double-sided paper from Whimsy Press and cut a square large enough to fit my card in, once it was all folded up (about 11.25" x 11.25").
You'll see from the instructions that you have to fold the paper into thirds. Which was actually quite hard. I ended up measuring it with a ruler. You have to do that twice [sigh!] :-) but once that part's done, the rest takes about 10 minutes (you do a bit more folding and then close it up).
Okay, it took about 20 minutes the first time I tried! I couldn't work out how on earth to close the darn thing - clearly, that's why it's called a 'puzzle' purse! ha! :-)
Basically, you pinch the paper together on opposite sides like this...
... and then twist your wrists in opposite directions at the same time as you move one hand slightly away from you and one hand slightly towards you.
Sound kinda complicated? Well, it was! This was the bit that took me a while to figure out! ;-)
After you've done it once though, it becomes so easy and fun. Then, you simply tuck the ends in under each other...
... and you end up with a sweet, little puzzle purse that can be used for all sorts of different things.
I've used this technique for envelopes and CD covers, just by varying the size of the square you begin with. There must be loads of other ways to use it!
Hope you're having a lovely Tuesday! What are you up to this week? I can't wait to see what you make! :-)
Lots and lots of love
Fi
xx
Labels:
Fi,
Love letter,
Origami,
Paper,
Puzzle Purse,
Valentines,
Whimsy Press
Subscribe to:
Posts (Atom)