
Wow! What a day, so far?! I had no idea what I was going to do for my Step Twelve when I woke up this morning! My head was completely empty of ideas! :-) I wanted to give paper-cutting a miss this week, even though I really enjoy it. Sometimes, you can have too much of a good thing and after last week, I needed a rest.
I had a vague idea that I might bake some cupcakes. It's Sophie's birthday today (my rescue dog), so I thought my creative challenge might be to decorate the cakes with doggy fondant figures, or maybe Easter designs - bunnies and little chicks!
It's been a bit of a slog at times since we rescued Soph almost a year ago, so I wanted to make something for us automatic biscuit dispensers to enjoy and celebrate with! She won't be getting the cupcakes, but I don't feel bad! :-) She's done very well today, with a new collar, new bed and more treats than she can wag her tail at! No doubt, her doe eyes will wrangle a cupcake out of us later too! ;-)
So, that's what I set out to do this morning. I'd measured all of the ingredients and got a couple of eggs out of their box... and then, I had a sudden flashback to my childhood and a vague recollection of painting eggs at Easter.
As I was going to use the eggs for the cakes, it seemed a shame to waste the shells. So, I kept the cupcake decorating as a Plan B (in case the egg painting went terribly wrong! ha!) and went looking for instructions on how to paint an egg!
I had a quick look online for instructions on how to first empty and then paint eggs ... and ended up taking a slight detour, when I came across the Slovenian artist, Franc Grom. Wow! I wish I had a tiny drill to try out his technique... but it's probably best I don't. :-) I think I would only have been terribly disappointed in my results (and probably ended up in the hospital emergency room too!)

To empty the egg of its contents, you prick a hole in the top of the egg and then a slightly larger hole in the bottom. It's surprisingly easy to do - just push firmly (twist a little, if necessary) and the needle will suddenly slip through the shell.
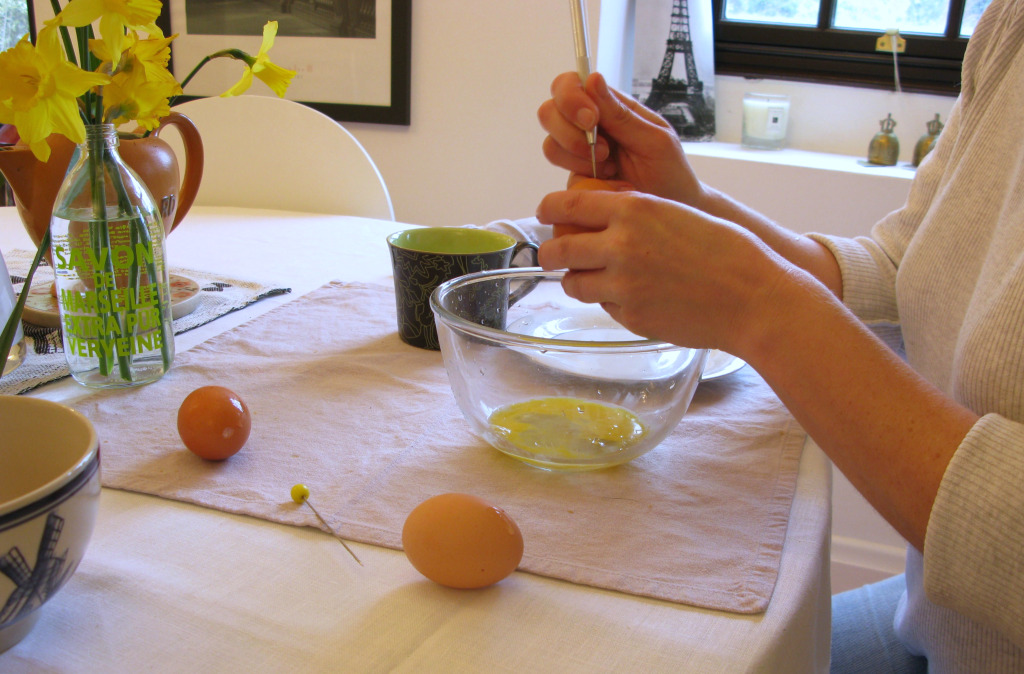
Push a long needle into the egg and jiggle it about to break up the yolk and then holding it over a bowl, blow through the small hole. The contents of the egg will pour out into the bowl. To clean the inside, fill the egg with water a few times and blow to empty.

Once clean, harden the shell and dry out the insides, by placing the eggs in an oven at about 160 degrees celcius (fan assisted) for 20 minutes. You can fill the holes with Plaster of Paris and smooth down, if you like, but I didn't have time!

I began by covering the egg in three coats of white. I had planned to paint three eggs in co-ordinating patterns and colours, but my head was buzzing with ideas - all different styles and subjects. I was paralysed with indecision, so had to stop and write all of my ideas down to quieten my mind. With it all out in front of me on paper, my decision seemed easy. I would paint three babushka dolls. I quickly ran out of time though and only completed one! :-)

I drew an initial sketch on paper with lots of details, but as I went along, I realised I didn't have small enough brushes for her tiny features. So, my finished design on the egg ended up being very simple.
To paint, I put a long pin through the holes of my egg to hold it whilst I was painting and sometimes propped it up on the egg box.
The hardest bit is being patient. I should really have taken a couple of days to do this, but as I only had a couple of hours, I found I was smudging paint and making a bit of a mess! So, I got my hair dryer out and tried to speed things along! :-)

I used acrylic paint at first, but found it was annoyingly streaky... so, I'm not sure what the ideal paint would be for this project. Any advice? :-) In the end, I made do with a mix of acrylic, gouache (my favourite paint - but not brilliant for this job) and pens.

Finally, she was finished. I would have loved to have added more details, but I simply didn't have small enough brushes! Although, I realise as I type this that I could have used a toothpick... maybe?
I started this project very stressed. I had no idea what I was doing and no firm direction. However, once I wrote and sketched all of my ideas out, I felt the stress lift and instead, felt blissfully happy! :-) I really enjoyed creating my babushka. I still have two more eggs to paint, but I'm not sure if I shall find the time - things are pretty hectic here just now! :-(
As a finishing touch, I glued on a teeny, polymer clay flower that I made a couple of months ago. I'm going to explore polymer clay for one of my Steps this year, so will leave it till then to explain more about how I made it.
I had planned to hang my eggs on bare tree branches with pretty ribbon, but there's no time left to thread this egg today, let alone paint the other two! Ha! :-) Drat! So many ideas and simply not enough time! :-)

As always, can't wait to see what you've been up to! Especially this week, as I know you've been snowed under with school work. I can't imagine how you'll find the time for anything! Not long till your holidays now though, love! Yipee! :-)
Lots and lots of love,
Fi
xx


No comments:
Post a Comment